Light-O-Rama gives you the tools to make your lights do amazing things. In addition to simply turning them on and off, you can turn them on to varying levels of brightness, have them fade up or down, shimmer, or twinkle. You can make RGB lights change to any color. And with motion effects, you can apply colorful patterns to pixel-based props.
The process involves assigning these effects to grid rows in a sequence using the Sequencer. The sections below will describe how to create effects using the toolbar. However, most tools also have a shortcut key, which will be noted below. In addition, most tools can be accessed using the grid's right-click context menu.
To summarize, you can add effects by using any of the following methods:
When using the toolbar, only one Select Action can be active at a time. Click on the icon for the tool in order to make it active. The active tool will have a border drawn around it.
•When the Select tool is active, the standard mouse pointer is displayed when you move the mouse over the grid, and the mouse can be used to select grid cells.
•When any other tool is active, the mouse pointer specified in Cursor preferences is displayed, and effects will be placed in cells that are selected.
When using keyboard shortcuts or the right-click context menu to create effects, the Select Action on the toolbar is ignored.
Basic Operations: Max Intensity, Min Intensity, Fade Up, and Fade Down
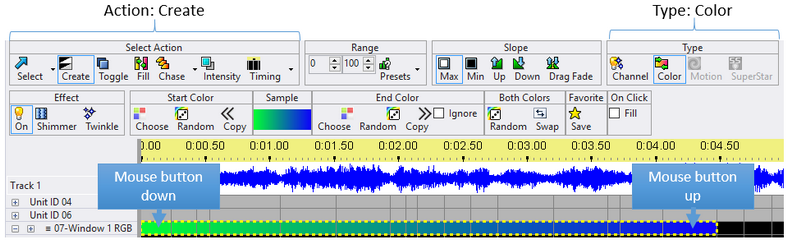
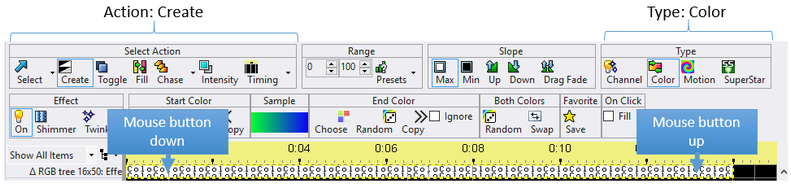
To start adding effects to a sequence using the toolbar, the first step is to set the Select Action to "Create". This is important! If you leave the Select Action as "Select", then no effects will be created.
Now set the Intensity Range. The range defaults to 0-100, which is usually fine for starting out. If you want different values, then type the numbers into the 2 boxes. The order of the numbers does not matter: entering 0 in the first box and 50 in the second has the same effect as entering 50 in the first box and 0 in the second. You can use the "Presets" button to quickly set common ranges.
Now choose the "Slope".
Slope Tool |
Button |
Action |
Max Intensity |
|
Applies the selected effect at the maximum value in the intensity range |
Min Intensity |
|
Applies the selected effect at the minimum value in the intensity range. If the minimum intensity is 0%, this will erase any existing effects where it is applied. |
Fade up |
|
Ramps the selected effect from the minimum value in the intensity range to the maximum value in the intensity range |
Fade down |
|
Ramps the selected effect from the maximum value in the intensity range to the minimum value in the intensity range |
Now choose the Effect Type:
Effect Type |
Description |
|
Simple effects originally meant to control AC-powered lights. However these effects can also be applied to RGB lights and pixels. |
|
Applies a color transition to an RGB light. However, these effects work equally well on RGB pixels. |
|
an effect intended for pixel-based display elements created by the Motion Effect Generator or the SuperStar Sequencer. The motion effect that will be applied when drawing on the grid is the one currently displayed in the Playback Window. Motion Effects can only be placed on Motion Effect Rows, and require a Pro level license. Furthermore, motion effects can only be displayed on lights connected to Enhanced LOR networks, or DMX networks. They cannot be displayed on LOR networks that are not enhanced. Lastly, they cannot be used in a stand-alone sequence that is loaded into a controller. |
|
These effects are created using the SuperStar Sequencer, but the data is stored in the S5 Sequencer's file. |
For a channel type, choose the specific effect:
Channel Effect |
Description |
|
the light is turned on (no shimmer or twinkle) |
|
causes your lights to quickly vary between on and off at a constant high rate. |
|
causes your lights to quickly vary between on and off at a random rate. |
|
this is useful for sending DMX commands to DMX devices that require specific DMX values (like some moving head lights). The DMX protocol supports intensities from zero to 255, and so this effect gives you precise control over the DMX intensities sent to a device. Please note that not all Light-O-Rama controllers support this functionality; DMX intensity events sent to a controller that does not support them will simply be ignored. To check whether any particular controller supports it, please refer to that controller's documentation. |
After making those choices and then moving your cursor over the sequence grid, your cursor will change to a pencil ![]() indicating that you are in "effect drawing mode". Click the left mouse button and drag over some cells. When you release the mouse button those cells will be filled with the effect you chose, at the intensity range you chose, and reflecting the tool type you chose.
indicating that you are in "effect drawing mode". Click the left mouse button and drag over some cells. When you release the mouse button those cells will be filled with the effect you chose, at the intensity range you chose, and reflecting the tool type you chose.

In the example above, an effect was applied to a regular channel row. However, this technique applies equally well to RGB channel rows. The only difference is that RGB channel rows need a color. If the color fade tool is open, then the color currently shown in the tool is used for the effect. If not, then the color shown on the toolbar (on the color fade button) is used.
In the example above, a colorized effect was applied to an RGB Channel Row. This technique applies equally well to Motion Effect Rows. When you do, it will apply the color to all of the pixels in the prop (a ColorWash motion effect). The only difference is the way the resulting motion effect is displayed in the grid. In the picture below, the display of motion effect names option is enabled.
You can even use the same technique to create loops in animation sequences. Loops don't use color, so it is more like the first example.

Each channel effect (on, shimmer, twinkle, and DMX intensity) has its own pattern when displayed on the sequence grid. This makes it easy to identify what your sequence is doing without even playing it back. The patterns are applied to both regular channel rows and RGB channel rows.

Keyboard Shortcuts for Basic Operations
All of the actions listed above can be performed using keyboard shortcuts. The actions listed below are also available on the right-click context menu.
Tool |
Shortcut Key |
Action |
Max Intensity |
|
applies the selected toolbar effect at the maximum value in the intensity range |
Min Intensity |
|
applies the selected toolbar effect at the minimum value in the intensity range |
Fade up |
|
ramps the selected toolbar effect from the minimum value in the intensity range to the maximum value in the intensity range |
Fade down |
|
ramps the selected toolbar effect from the maximum value in the intensity range to the minimum value in the intensity range |
On |
|
set selected cells to the ON effect at max toolbar intensity (ignores the toolbar effect selection) |
Shimmer |
|
set selected cells to the SHIMMER effect at max toolbar intensity (ignores the toolbar effect selection) |
Twinkle |
|
set selected cells to the TWINKLE effect at max toolbar intensity (ignores the toolbar effect selection) |
Any |
|
Use the currently selected tool (from the toolbar) on the grid selection |
Intelligent Fade Tool 
When using your mouse, the intelligent fade tool will create a:
•Fade Up when you use it by clicking and dragging left-to-right
•Fade Down when clicking or dragging right-to-left
•Fill if you click without dragging
This tool is not available when using the keyboard. Use the shortcuts for fade-up, fade-down, and fill instead.
Fill Tool 
Shortcut Key: |
|
The Fill tool can be used to create smooth fades from one effect to another. For example, if a fade up from 10% to 40% is followed by the lights being off, which is followed by a fade up from 20% to 80%, then applying the Fill tool on the area where the lights are off will make it into a fade down from 40% to 20%:
Before a fill...
... and after a fill
It can also be used in a similar manner on RGB channels to smoothly fade from one color to another.
Before a fill...
... and after a fill
The Fill tool can also be used on Motion Effect Rows.
Before a fill...
... and after a fill
With motion effects, the Fill tool tries to perform a cross-fade. However, you will achieve better results by creating the cross-fade yourself (which requires a second motion effects row):
Cross fading the 2 effects using a second motion effect row
The Fill tool does not do anything when used on cells that contain an effect.
The Intelligent Fade tool and the Color Fade tool can also be used to apply fills in certain situations.
Chase Tool 
Shortcut Key: |
|
The Chase tool can be used to take a pattern and "chase" it through several channels over a time range. For example:

Before a chase...

... and after a chase
Exactly what is chased, and where it is chased to, depends upon how you click-and-drag (or, if using the keyboard, how you expanded the selection). The lighting effects in the corner that you started dragging from will be chased to the corner that you finished dragging to so that, for example, you could chase effects "up" or "down" through channels.
The effects that are chased will include everything up to and including the last lighting effect in the channel that you start dragging from (or, if dragging backwards, everything from the first lighting effect).
The Chase tool can also be used on RGB channels:

Before an RGB chase...

... and after an RGB chase
The Chase tool can also be used on Motion Effect Rows:

Before a motion effect chase...

... and after a motion effect chase
The Chase tool has additional options that can be accessed by clicking on the small down arrow to the right of the chase button.

The Chase Options menu
•Row Mode:
•Auto: chase each prop if the effect being chased is a motion effect and that motion row applies to the entire prop (not a subsection); otherwise chase each row
•Chase Each Row: perform the chase on each row in the selected area
•Chase Each Prop: perform the chase on the first row of each prop in the selected area (makes a difference on pixel props with multiple motion effect rows)
•Clear Selection First: clears the chase area of any existing effects before placing the new effects that are part of the chase.
•Same Row Type: if selected, the chase will only occur on rows of the same type as the first row. For example, if the first row is a regular channel, any RGB channels or motion effect rows will be skipped. If there is no check mark next to this option, then the chase will proceed through all selected rows, regardless of type.
For example, consider the following sequence, and imagine that you want to chase the second fade up in the first channel:

Before chasing the second fade
If you had "Clear selection first" turned on, the chase would overwrite the ends of the existing fades in some of the other channels:

After chasing the second fade, with "Clear selection first" enabled
But with "Clear selection first" turned off, the existing effects are kept in place:

After chasing the second fade, with "Clear selection first" disabled
Motion Effect Tool 
After selecting one or more cells on a motion effect row with this tool active, the Motion Effect Generator will open. Create your effect and then click the OK button to close the Motion Effect Generator. The new effect will be placed in the selected cells. This tool requires a Pro level license.
SuperStar Tool 
After selecting one or more cells on a motion effect row with this tool active, the SuperStar Sequencer will open. After you finish your sequencing in SuperStar, close SuperStar by clicking on the Red X in the upper right of the program (there is no need to use SuperStar's save function). You will then be returned to the S5 Sequencer and your new SuperStar effects will be automatically saved as part of the S5 Sequencer's sequence. They will be displayed in the selected cells as a single effect at the maximum value in the toolbar's intensity range, This tool requires a Pro level license.
Color Fade Tool 
Shortcut Key: |
|
Note: the colors displayed on your screen will not necessarily match those shown by your actual RGB lights; you may have to experiment to determine colors that wind up looking the way you want, and different RGB devices may show different colors when sent the same intensities.
The Color Fade tool can be used to apply colors to RGB channels and Motion Effect Rows. Setting the Effect Type to "Color" on the toolbar displays a set of buttons that enables you to specify the colors to be used:

With the Color Fade tool selected, clicking and dragging an area of an RGB channel or multiple RGB channels will cause that area to become those colors:
![]()
Applying a color fade to an RGB channel
If you drag backwards, however, the colors will be applied in reverse order (this also happens if you are using the keyboard, and expand the selection from right to left instead of left to right):
![]()
Applying a color fade to an RGB channel by dragging backwards
If the "On Click - Fill" box is checked in the window and you click on an empty cell (as opposed to clicking-and-dragging) will cause the Color Fade tool to perform a fill, smoothly fading from the preceding color to the following color:
![]()
![]()
Before clicking the empty area... ... and after clicking the empty area
If the "On Click - Fill" box is not checked and you click on an empty cell, then the color sample will be applied to the cell that was clicked.
The Color Fade toolbar buttons give several ways to select the colors to be used:
•The "Choose" buttons on either side will open a color picker dialog to specify the color for that side
•The "Copy" button on either side will copy the color from the opposite side
•The "Swap" button will move the two colors to their opposite sides
•The "Random" buttons on either side will apply a random color for that side
•The "Random" button in the "Both Colors" section will apply random colors to both sides
The Color Fade tool takes into account the selected effect on the toolbar. For example, here is a twinkling color fade:
![]()
A twinkling color fade