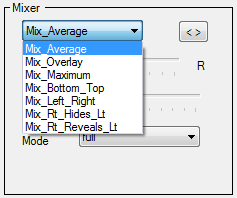
In the Pixel Editor's Effect Generator, you can use just the left side of the window to create your effects. But for even more creative possibilities, you can create a second effect on the right and see the mixed result in the middle. Controls below the middle window adjust how the left and right sides are mixed. You can select the type of mixing with the drop down, then control the strength (more left or more right) using the slider. You can also adjust the brightness of the result using the Brightness Mode drop down. For some mix types you may want to swap the left and right effects. This is easily accomplished using the “<>” button.
Masking Effects on One Side
If you just want effects displayed on the left or right side of your prop, set the mixer to "Mix_Left_Right". If you want an effect on the left side of your prop, use the effect selection on the left side of the Effect Generator and make sure the right side effect is set to "none". If you just want the effect on the right side of your prop, use the effect selection on the right side of the Effect Generator and make sure the left side effect is set to "none". Use the slider below the Mix selection to determine where the separation between left and right occurs.
The same technique can be used if you want an effect only displayed at the top or bottom. Just set the mixer to "Mix_Bottom_Top".
But what if you want to display only rows or columns in the middle of your prop, or some pattern of rows or columns? This is discussed in the next topic, "Masking Effects on Arbitrary Rows or Columns":
Masking Effects on Arbitrary Rows or Columns
Sometimes you just want to light up certain rows or columns on your display element (e.g. a pixel tree or matrix). In this topic we show you how. Here are the steps:
1.Open Microsoft Paint (you can use other paint programs, but you will have to adapt these instructions for your preferred paint program).
2.Type Ctrl-E to open the image properties. Set the units to "Pixels" and the Colors to "Color". Set the width and height to exactly match the dimensions of your prop. Click "OK" to save the changes.

3.Zoom in as much as possible to make it easier to see your new image.
4.Make the current color black. Use the fill tool (the paint can icon) to turn the entire image black.
5.Make the current color white. Use the pencil tool to draw white in the rows and/or columns where you will want effects displayed. The example shown below is 5 pixels wide by 10 pixels high. Columns 2 and 4 have been painted white. When used as a mask in the following steps, this will only allow effects to be displayed in those two columns.

6.Save the result as a PNG image (BMP is OK too), and then close Microsoft Paint. Remember where you save it.
7.Open the Pixel Editor's Effect Generator.
8.On the right side, select the prop you generated the mask for.
9.Change the right effect to "Picture". Click the "Choose" button and select the image file that was created above. Uncheck "Scale Image".
10.In the middle, set the mix to "Mix Rt. Reveals Lt."
11.Change the left effect to the desired effect. Only the rows or columns you enabled (turned white) in your image will light up in the middle (result) window.
12.You can enable the opposite columns by changing the mix to "Mix Rt. Hides Lt.".
13.You can make the mask move by changing the "Movement" setting on the picture effect.
Here is the result (the bars effect is shown, but the technique works with any effect selected on the left):
