The Light-O-Rama Sequence Editor's Edit menu contains menu items that let you modify sequences in a variety of ways, as well as to set your preferences for the behavior of the Sequence Editor.
Most of these menu items apply to the currently selected sequence, or to the active track of the currently selected sequence. There can be many sequences open in the Sequence Editor simultaneously, but only one is the currently selected sequence. It can be distinguished by its bright blue title bar (as opposed to the pale blue title bar of unselected sequences). You can select a sequence simply by clicking on its window.
•Enable/Disable Undo Recording
•Cut, Copy, Paste, and Paste Multiple
•Select Columns, Select Rows, and Select All
•Export and Import Channel Configuration

The Sequence Editor's Edit menu
Undo and Redo
These allow you to undo and redo changes that you make to a sequence. A wide variety of changes can be undone and redone - changing lighting effects, moving timings, inserting channels, and many more. The next change to be undone or redone is named in the menu item:
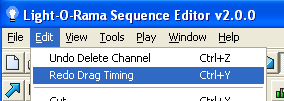
The next items to be undone or redone are named on the menu
There is a limit to how many changes will be remembered for the purposes of undo and redo, so if you make many changes to a sequence and then start undoing them all, you may eventually reach a point where you can't undo any more, even though you haven't undone all of the changes that you made.
Also, you will not be able to undo any changes made before the last time that you saved the sequence.
A related option is to use "Revert to Saved" from the File menu. This will reload the sequence as it was the last time that you saved, getting rid of all changes since that time.
Undo and redo have keyboard hotkeys: Ctrl-Z and Ctrl-Y, respectively.
Enable/Disable Undo Recording
Certain very large operations in the Sequence Editor could take a very long time to do. For example, skewing a track involves changing all of the timings, effects, and loops in the track; in a large sequence with many channels, this could take a prohibitively long time. Much of the time spent is actually due to recording the changes so as to later be able to undo and redo them.
For situations like this, you can disable undo recording before making such a change, which will speed up how long the change will take. You will not be able to undo any changes after doing so (except for changes that you make after re-enabling it later), so it is strongly suggested that you save your sequence before disabling undo recording.
Cut, Copy, Paste, and Paste Multiple
When editing a sequence, you can select an area using your mouse or keyboard, and cut or copy the lighting effects in that area. You can then paste the contents of that area to another spot - even to a spot within a different sequence. Note that this copies only the lighting effects, not the timings - see "Copy and Paste Timings" for how to copy timings.
"Paste Multiple" allows you to paste the cut or copied events multiple times in a row - even to the end of the sequence:

The Paste Multiple dialog
The Sequence Editor supports four different pasting modes - "paste by time", "paste by cell", "repeat to fit" and "stretch to fit" - and a pasting option, "paste from foreground". Which of these is selected will affect how the pasted effect events will look.
Cut, copy, and paste have keyboard hotkeys: Ctrl-X, Ctrl-C, and Ctrl-V, respectively.
Set Paste Mode
When a set of lighting effects is copied (or cut) in the Sequence Editor, it can be pasted in several different manners: "paste by cell", "paste by time", "stretch to fit", and "repeat to fit". You can control which paste mode is used via the "Set Paste Mode" submenu of the Edit menu, or via the Clipboards subpanel of the left-hand Tools panel.
There is also a pasting option, "paste from foreground". This can be also controlled via "Set Paste Mode" or the Clipboards subpanel.
Copy and Paste Timings
You can select a set of timings using the keyboard or the mouse, and use "Copy Timing" to copy them. After that, you can paste the timings to another point in the sequence (or even to another sequence) using "Paste Timing". Note that this copies only the timings, not any lighting effects (see "Cut, Copy, Paste, and Paste Multiple" for information on copying lighting effects).
For example, if you copy timings that are at 3 seconds, 3.5 seconds, and 5 seconds, and paste those timings starting at 7 seconds, you will wind up with timings at 7 seconds, 7.5 seconds, and 9 seconds.
Paste Timing allows you to optionally choose to paste the timings multiple times in a row:

The Paste Timing Multiple dialog
You can also copy and paste timings via the right-click context menu, in a few ways. Depending on the situation, using one of them may be more convenient than doing so via the Edit menu. For example, one of the options on that menu allows you to paste the timings once to the exact spot that you right-clicked on, getting rid of the need for the Paste Timing Multiple dialog.
Copy Timing and Paste Timing have keyboard hotkeys: Shift-Del and Shift-Ins, respectively.
Select Columns, Select Rows, and Select All
These menu items allow you to select an entire column or set of columns (representing time) or an entire row or set of rows (representing channels), or both.
You can also select columns or rows from the right-click context menu.
Change Track Name
Tracks can optionally be given names. They can be set when the track is created, or via this menu item. The track's name (if any) will be displayed on its track bar, among other places.
Skew Track
Skewing a track will move all of its events, timings, and loops by some specified amount of time. A track can be skewed either to the left - i.e. shifting its events (and such) earlier in time - or to the right - i.e. shifting them later in time.
After selecting "Skew Track" from the Edit menu, a window will open up, allowing you to choose the size and direction of the skewing:

The Skew Track dialog
After completing this dialog, the active track will be skewed by the amount, and in the direction, that you chose.
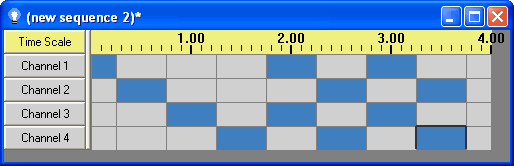
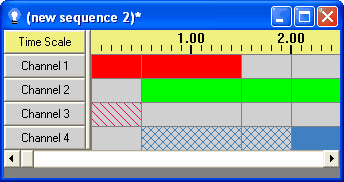
Here is an example of a simple sequence, before and after skewing to the left by one-quarter second:

A simple sequence, before skewing
The same track, after skewing to the left by 1/4 second
Add New Track
This menu item allows you to add a new track, with new channels, to a sequence, using the Add New Track dialog.
Tip: To use the same channel in more than one track, do not simply set two channels in different tracks to point to the same hardware controller (i.e. to have the same unit number, circuit number, et cetera). Doing so will likely cause unexpected and undesired results, as the two channels compete for control over the same circuit. Instead, copy the channel to a new track or to an existing track. Or, if you want to share all the channels in a track with another track, duplicate the track.
Duplicate Track
This menu item instructs the Sequence Editor to duplicate all of the channels in the current track to a new track. The channels will be shared between the two tracks.

The Duplicate Track dialog
Change Total Time
This menu item allows you to change the duration of the active track. Note that all tracks in a musical sequence (as opposed to an animation sequence) must have the same length, so changing the length of one track in a musical sequence will automatically change the length of all of them.
For information on the format used to specify an amount of time, please see Time Format.

The Change Total Time dialog
Timings
This submenu of the Sequence Editor's Edit menu has various timing-related functions:
Insert Multiple Timings
This allows you to insert multiple timings into the current selection, to divide it into equally-sized parts. For example, if you select an area whose time range is from 6 to 8 seconds, and use "Insert Multiple Timings" to insert three equally spaced timings, then the new timings will be inserted at 6.5, 7, and 7.5 seconds, splitting the selection into four equally spaced parts of half a second each.
See also Subdivide Timings, which divides each selected cell into equally-sized parts, as opposed to dividing the entire selection into equally-sized parts.
Subdivide Timings
This allows you to insert multiple timings into the current selection, dividing each selected cell into equally-sized parts. For example, if you select three cells, from 2 to 3 seconds, 3 to 3.6 seconds, and 3.6 seconds to 4 seconds, and use "Subdivide Timings" to subdivide into two cells, you will end up with six cells, from 2 to 2.5, 2.5 to 3, 3 to 3.3, 3.3 to 3.6, 3.6 to 3.8, and 3.8 to 4.
See also Insert Multiple Timings, which divides the entire selection into equally-sized parts, as opposed to dividing each selected cell into equally-sized parts.
Delete Extraneous Timings
The purpose of timings is to allow you to easily select a time range to apply a lighting effect to. Sometimes, a sequence winds up having timings which are not necessary for any of the existing lighting effects - for example, everything that was on before the timing is also on after the timing, everything twinkling before is also twinkling afterwards, and so forth.
"Delete Extraneous Timings" lets you automatically get rid of all such timings. Deleting these timings is not really necessary - it makes no difference to how your lights will behave - but it may make your sequence easier to understand and to edit by reducing clutter. It may also be useful, for example, when using the Tapper Wizard's "Snap to Existing Timings" functionality.
The following pictures are a before-and-after of deleting extraneous events. Note that the timing event at one second in the first picture is not necessary - every channel that is on before it is on after it, every one that is twinkling before it is twinkling after it, and so forth. The second picture - after deleting extraneous events - therefore does not have this timing. However, the way that the lights operate will be the same in both cases.

Before deleting extraneous timings
After deleting extraneous timings
Switch Timing Grid
Selecting this menu item opens a dialog window allowing you to switch which timing grid is currently used by the active track. You can switch to an existing timing grid simply by selecting it from the dropdown list, or switch to a new fixed or freeform timing grid, or a new freeform grid with copies of all the timings in the current grid, by clicking on the appropriate button:

The Switch Timing grid dialog
Change Timing Grid Name
This menu item allows you to change the name of the current timing grid. The main purpose of giving a name to a timing grid is so that they can be easily distinguished when listed in places such as the Tracks and Timings toolbar's timings dropdown list.
Lock Timings
Each timing in a sequence is a particular point in time (since the beginning of the sequence), and is represented by a vertical grey line. If "Lock Timings" is off (unchecked), and the current timing grid is a freeform timing grid, you can change the time of a timing by hovering over its line with your mouse (which will change your mouse cursor from a "pointer" cursor to an "east-west" cursor), and clicking and dragging the line to the left or the right.
If "Lock Timings" is on (checked), you cannot do this. This prevents you from accidentally changing the time of a timing while you're trying to modify the lighting effects in a cell between two timings.
See also "Drag Events with Timings", which controls whether or not effect events that start or end at the dragged timing will be dragged along with it.
Drag Events with Timings
Timings in a sequence can be dragged with the mouse to change the time that they are at (unless the Lock Timings option is turned on). If "Drag Events with Timings" is turned on, and any effect events start or end at the same time as the timing being dragged, they will be dragged along with it. If not, only the timing will move; the effect events will remain unchanged.
Confirm Long Timing Drags
If you change the time of a timing by dragging it with your mouse (as described in "Lock Timings"), and at some point in your drag you went past the previous timing or the next timing, the Sequence Editor guesses that you might not have actually intended to change the timing's time; rather, you might have accidentally clicked on the timing's line and dragged it while intending to do something else, like modifying the lighting effects near the timing.
In this case, the Sequence Editor will ask if you really want to change the timing, unless you turn off (i.e. uncheck) "Confirm Long Timing Drags", in which case it will simply move the timing without asking.
Turn on Loops
Animation sequences (but not musical sequences) can contain loops: When a certain point in the sequence - the end of a loop - is reached during play, play continues at the start of the loop instead of continuing straight through, until the loop has been done a certain number of times (which you can choose).
When an animation sequence is created using the New Animation dialog, you have the option to say that loops will be used in the sequence. Doing so will cause a white "loop level" row to be present above all of the grey "channel" rows in the sequence.
If you did not choose to use loops in the New Animation dialog, you will not get a loop level row in your sequence. However, if you later decide that you do want to use loops, you can use "Turn on Loops" to add a loop level to the sequence.
Sequence Info
This brings up a dialog displaying various information about the sequence, allowing you to change some of it:
•Created By: The creator of the sequence as specified in the New Animation dialog or the New Musical Sequence dialog. This value cannot be edited.
•Created At: The date and time at which the sequence was created. This value cannot be edited.
•Modified By: If you modify a file that was created by someone else, you can enter your name here, if you wish.
•Music Artist: For musical sequences, the artist who performed the song.
•Music Title: For musical sequences, the name of the song.
•Music Album: For musical sequences, the name of the album that the song is from.

The Edit Sequence Info dialog for a musical sequence
Media File
This menu item allows you to specify the audio or video file that should be used with the current sequence. This may be useful, for example, if you have changed the directory that you store your media files in.
It is available only for musical sequences, not animation sequences.
Use Internal Media
When Use Internal Media is checked, the Sequence Editor will look at the type of media (audio or video) as well as if the internal media was created or not. It will then select the best file with which to sequence. When enabled, this option allows the Sequence Editor the ability to automatically fix many of the playback issues that can arise with different media. This includes such problems as those related to Variable Bit Rate, nonstandard encoding rates, etc. It is suggested that you leave this option checked.
When it is unchecked, any internal media that has been created is ignored, and the user-specified media file is used. Basically, when unchecked, media handling will be identical to what it was previous to version 3.10.0.
The default value for Use Internal Media for new sequences is checked. This can be changed via Edit / Preferences / New Musical Sequence Preferences, or via the New Musical Sequence Options dialog (where it will be saved if you select "Save as Defaults"). When loading sequences created in prior versions of the Sequence Editor, this option defaults to unchecked, to allow for the same processing as those older versions.
Windows Command
Selecting "Windows Command" from the Sequence Editor's Edit menu will open up a dialog allowing you to specify an arbitrary Windows shell command to be executed whenever the sequence is run (whether by the Sequence Editor or by the Show Player). This dialog also allows you to choose how the window for the command will be opened - for example, whether it will be maximized or not.

The Windows Shell Command dialog.
Export and Import Channel Configuration
Every channel in a sequence has various information associated with it, such as its name, display color, and hardware information such as the unit number of the controller and the circuit number of the string of lights on that controller.
You can set up this information in various ways, such as via the Channel Configuration screen. However, it may be the case that you often want to do this the exact same way, for several different sequences, using the same channel names, hardware assignments, et cetera. Rather than manually setting it up every time, you can use the Export and Import Channel Configuration menu items.
Once you have the correct channel information set up for a particular sequence, you can choose "Export Channel Configuration" to save the channel information to a channel configuration file. When you create another sequence and you want to use the same controllers and the same circuits, you can simply choose "Import Channel Configuration" and select the channel configuration file that you previously exported to.
The saved channel configuration information also includes the animation associated with the exported sequence, so you will not have to redraw it every time.
If your exported sequence contains more channels (or tracks) than the sequence that you are importing to, new channels or tracks will automatically be created in the latter sequence during the import (or, if the channels in a track of the configuration file are copies of channels in earlier tracks of the configuration file, copies of the corresponding channels from the earlier tracks of the sequence will be put into the later tracks of the sequence). On the other hand, if the exported sequence contains less channels (or tracks), the extras in the sequence that you are importing to will simply remain unchanged.
When exporting and importing from and to sequences with more than one track, there are two potential minor side effects:
First, if a track in the sequence contains only channels that are copies of channels in earlier tracks of the sequence, and the channel configuration does not contain a track at the corresponding position, then the track will be removed from the sequence. Note that the channels from the track are not removed from the sequence - they are only removed from the track (and, since the track then contains no channels, the track is removed from the sequence). The channels will still be present in earlier tracks of the sequence.
Second, if a track in the sequence contains a channel which is not a copy of a channel of an earlier track in the sequence, and the channel configuration file does not contain a channel at the corresponding position (other than copies of channels from earlier tracks), then the channel will be "pushed down" towards the bottom of the track.
Preferences
The Preferences submenu of the Edit menu allows you to open various preference dialogs that affect how the Sequence Editor will behave:
•Holiday Lights Designer Preferences
•New Musical Sequence Preferences
For detailed help on each, please refer to their individual help file pages.