In the Sequencer’s Motion Effect Generator, you can use just the left side of the window to create your effects. But for even more creative possibilities, you can create a second effect on the right and see the mixed result in the middle. Controls below the middle window adjust how the left and right sides are mixed. You can select the type of mixing with the drop down, then control the strength (more left or more right) using the slider. You can also adjust the brightness of the result using the Brightness Mode drop down.
•Masking Effects on Arbitrary Rows or Columns

Mixer Section of the Motion Effect Generator
Mix Types

Mix Types
Mix Average
The combined effect is a weighted average of the effect on the left side with the effect on the right side. The weighting is determined by the slider below the Mix Type selector. Setting the slider all the way to the left will result in the combined effect being the same as the left effect. Setting the slider all the way to the right will result in the combined effect being the same as the right effect. Setting a transition mode on the slider can be a used to smoothly transition between the left and right effects.

A 50% mix of left and right, leaves both effects dimmed in the combined effect.
Mix Overlay
Areas that are completely black on one side, will be replaced by the corresponding area on the other side. Areas that are not black on both sides will behave like Mix Average.

In Mix Overlay mode, the transparency of the meteor tails is not taken into account.
Mix Alpha Blend
Darkened areas of effects are treated as partially transparent (or completely transparent if black). The combined effect overlays the left effect on top of the right effect, blending the areas that are partially transparent.

With Mix Alpha Blend, the tails of the green meteors are properly blended with the blue background.
Note that the Picture effect also supports transparency:
•GIF images can have a single color that is designated as the transparent color, and any pixels with that color are treated as transparent. Thus pixels in a GIF image are either fully transparent or fully opaque.
•PNG images support partial transparency -- any pixel in the image can be fully transparent, fully opaque, or somewhere in between.

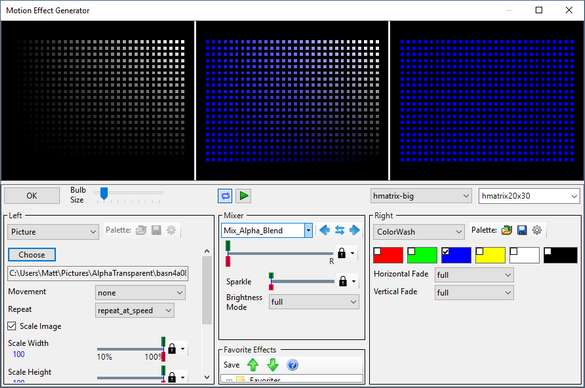
PNG image blended with a blue color wash. The picture on the left is white across the top and gradually fades out to black across the bottom; transparency goes from completely transparent on the left to completely opaque on the right.
Mix Maximum
For each pixel in the combined effect, the pixels from both sides are used to achieve maximum brightness. This is calculated as the maximum of the red values from each side, the maximum of the green values from each side, and the maximum of the blue values from each side.

In Mix Maximum mode, the meteor tails get blended, but produce the wrong color (teal instead of green).
Mix Bottom / Top
The left effect is used on the bottom portion of the combined effect, and the right effect is used on the top portion. The split between bottom and top is controlled by the slider below the Mix Type selector.

Mix Bottom / Top example
Mix Left / Right
The left effect is used on the left portion of the combined effect, and the right effect is used on the right portion. The split between left and right is controlled by the slider below the Mix Type selector.

Mix Left / Right example
Mix Right Hides Left
The combined effect is the left effect, except where there are non-black pixels on the right. In other words, the right side creates a hole in the left side.

Mix Right Hides Left example
Mix Right Reveals Left
The combined effect is the left effect, only where there are non-black pixels on the right.

Mix Right Reveals Left example
Mix Vertical Center / Edges
The left effect is used on the center portion of the combined effect, and the right effect is used on the left and right edges. The split between the center and edges is controlled by the slider below the Mix Type selector.

Mix Vertical Center / Edges example
Mix Horizontal Center / Edges
The left effect is used on the middle portion of the combined effect, and the right effect is used on the top and bottom edges. The split between the middle and edges is controlled by the slider below the Mix Type selector.

Mix Horizontal Center / Edges example
Mix Center / Edges
The left effect is used on the center portion of the combined effect, and the right effect is used on all edges. The split between the center and edges is controlled by the slider below the Mix Type selector.

Mix Center / Edges example
Mix Odd / Even Columns
The left effect is used on odd-numbered columns of the combined effect, and the right effect is used on even-numbered columns.

Mix Odd / Even Columns example
Mix Odd / Even Rows
The left effect is used on odd-numbered rows of the combined effect, and the right effect is used on even-numbered rows.

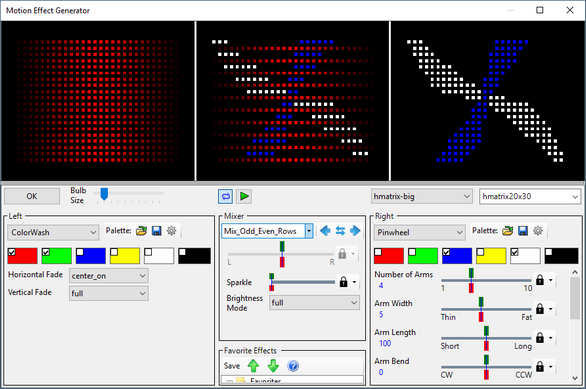
Mix Odd / Even Rows example
Overlay From Top
This does an alpha blend on the top and the right effect on the bottom. The split between bottom and top is controlled by the slider below the Mix Type selector.

Overlay From Top example
Overlay From Bottom
This does an alpha blend on the bottom and the right effect on the top. The split between bottom and top is controlled by the slider below the Mix Type selector.

Overlay From Bottom example
Overlay From Left
This does an alpha blend on the left and the right effect on the right. The split between left and right is controlled by the slider below the Mix Type selector.

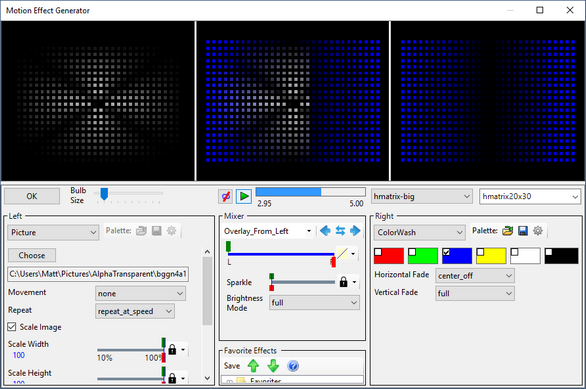
Overlay From Left example
Overlay From Right
This does an alpha blend on the right and the right effect on the left. The split between left and right is controlled by the slider below the Mix Type selector.

Overlay From Right example
Dissolve Bottom / Top
This is like Mix Bottom / Top, except that the transition area is blended.

A transition from the left effect to the right effect, with a blended area in the middle.
Dissolve Left / Right
This is like Mix Left / Right, except that the transition area is blended.

A transition from the left effect to the right effect, with a blended area in the center.
Dissolve Blocks
This divides the effect area into 9 sub-blocks (3 x 3) and transitions one block at a time.

Here, 4 of the 9 blocks have completely transitioned, and the 5th block (center) is partially transitioned.
Copy/Swap Buttons
In some cases, you might want to copy an effect from one side to the other, or to swap them. This can be done using the buttons to the right of the mix type selector. If the buttons are not displayed, try making the Motion Effect dialog wider by dragging the left or right edge of the dialog.
Button |
Action |
|
Copies the effect on the right side to the left side. |
|
Swaps the effects on the left and right sides. |
|
Copies the effect on the left side to the right side. |
Sparkle
The Sparkle slider does what it says: move it to the right to add some sparkle to the combined effect. Move it farther to the right and sparkles will be created at a faster rate.

Sparkle applied to a red Color Wash effect
Brightness Modes

Brightness Modes
Full
The "Full" mode displays the effect at maximum brightness. Note that with the brightness mode set to "Full", the effect can still be dimmed by placing the effect in the sequence grid at less than 100% intensity.
Manual
Switching to "Manual" mode will display a slider below the Brightness Mode selector, allowing you to manually adjust the brightness of the combined effect. Move the slider to the left to make the effect dimmer; move it to the right to make it brighter.

Manual brightness example
Strobe
The "Strobe" mode will cause the combined effect to flash with a short "on" time and long "off" time. A slider below the Brightness Mode selector allows you to adjust the flash rate. Move the slider to the left to make the flash rate slower; move it to the right to make it faster.

Strobe example
Fade In And Out
The "Fade In and Out" mode will cause the combined effect to smoothly fade in and out. A slider below the Brightness Mode selector allows you to adjust the fade rate. Move the slider to the left to make the fade rate slower; move it to the right to make it faster.

Fade In And Out example
Blink In Unison
The "Blink In Unison" mode will cause the combined effect to flash with equal on and off times. A slider below the Brightness Mode selector allows you to adjust the blink rate. Move the slider to the left to make the blink rate slower; move it to the right to make it faster. Effects with the same blink rate on multiple props will result in those props blinking in unison (i.e. the blinking will be synchronized).

Blink In Unison example
Masking Effects on One Side
If you just want effects displayed on the left or right side of your prop, set the mixer to "Mix_Left_Right". If you want an effect on the left side of your prop, use the effect selection on the left side of the Effect Generator and make sure the right side effect is set to "none". If you just want the effect on the right side of your prop, use the effect selection on the right side of the Effect Generator and make sure the left side effect is set to "none". Use the slider below the Mix selection to determine where the separation between left and right occurs.
The same technique can be used if you want an effect only displayed at the top or bottom. Just set the mixer to "Mix_Bottom_Top".
Masking Effects on Arbitrary Rows or Columns
Sometimes you just want to light up certain rows or columns on your display element (e.g. a pixel tree or matrix). In this topic we show you how. Here are the steps:
1.Open Microsoft Paint (you can use other paint programs, but you will have to adapt these instructions for your preferred paint program).
2.Type Ctrl-E to open the image properties. Set the units to "Pixels" and the Colors to "Color". Set the width and height to exactly match the dimensions of your prop. Click "OK" to save the changes.

3.Zoom in as much as possible to make it easier to see your new image.
4.Make the current color black. Use the fill tool (the paint can icon) to turn the entire image black.
5.Make the current color white. Use the pencil tool to draw white in the rows and/or columns where you will want effects displayed. The example shown below is 5 pixels wide by 10 pixels high. Columns 2 and 4 have been painted white. When used as a mask in the following steps, this will only allow effects to be displayed in those two columns.

6.Save the result as a PNG image (BMP is OK too), and then close Microsoft Paint. Remember where you save it.
7.Open the Motion Effect Generator.
8.On the right side, select the prop you generated the mask for.
9.Change the right effect to "Picture". Click the "Choose" button and select the image file that was created above. Uncheck "Scale Image".
10.In the middle, set the mix to "Mix Rt. Reveals Lt."
11.Change the left effect to the desired effect. Only the rows or columns you enabled (turned white) in your image will light up in the middle (result) window.
12.You can enable the opposite columns by changing the mix to "Mix Rt. Hides Lt.".
13.You can make the mask move by changing the "Movement" setting on the picture effect.
Here is the result (the bars effect is shown, but the technique works with any effect selected on the left):
