Sequences can be edited in the Light-O-Rama Sequence Editor using the mouse:
See also "Editing Sequences Using the Keyboard".
Selecting a Cell
Sequences are displayed in the Sequence Editor as a grid. Rows represent channels, and columns represent timings. Cells in the grid therefore represent the lighting effects that will happen on channels at various points in time while the sequence is being played.
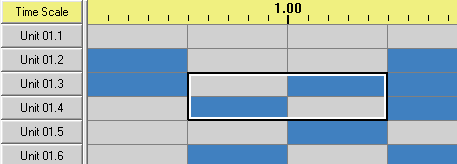
A cell, or a range of cells, can be selected, allowing you to apply various tools to it (such as specifying what lighting effects should take place in that cell). You can recognize the currently selected cell (or cells) by a thick black and white border. For example, in the following sequence, the cell of the third channel between 1 second and 1.5 seconds is selected:

The time between 1 and 1.5 seconds of the third channel is selected
Using the mouse, you can change which cell is selected by simply clicking in the cell that you want to be selected. However, unlike when you select a cell using the keyboard, this will not just select the cell - it will also apply the current effect tool (from the Tools toolbar) to the cell. So, for example, it might turn the cell on, or off, or cause it to twinkle, or fade up. So, if you want to just select a cell without changing its contents, either use the keyboard, or make sure that your current effect tool is the Selection tool.
Another option is to right-click in the desired cell. This will select the cell, and will not apply the current tool, but it will also bring up the right-click context menu. One exception: If you already have multiple cells selected, and you right click on one of those cells, that cell will not become the currently selected cell. Instead, the whole range of cells will remain selected, and the right-click context menu will pop up, applying to the entire range of cells.
Selecting Multiple Cells
You can select multiple cells using the mouse in two ways: either click and drag from the first to the last, or click in the first, move (without necessarily dragging) to the last, and shift-click in the last. Note that this will not just select the cells; it will also apply the current tool (from the Tools toolbar) to the cells. For example, it will make them shimmer, or fade down. So, if you want to select multiple cells without changing their contents, either use the keyboard, or make sure that the current tool is the Selection tool.
Right-clicking can also be used to select multiple cells, but will bring up the right-click context menu rather than applying the current tool.
Four cells are selected, two each in two different channels
Modifying Cells
Simply selecting a cell or a range of cells will apply the current effect tool (from the Tools toolbar) to the selection.
Another option is to right-click on the cell or cells, which will bring up the right-click context menu. This menu has a variety of options for modifying the cells.
Other Mouse Usage
Various popup menus and dialogs can be obtained by using the mouse:
•Right-clicking on the sequence grid brings up the right-click context menu.
•Left-clicking on a channel button brings up that channel's Channel Settings dialog.
•Right-clicking on a channel button brings up that channel's popup menu.
•Left or right-clicking on a track bar brings up that track's context menu.
•Left or right-clicking on a loop level portion of the grid brings up the Loop Context menu.
•Left or right-clicking on a loop level's button brings up part of the Loop Context menu (the items related to the whole loop level, rather than individual loops).
Additionally, the menu bar and the toolbars can be accessed via the mouse in the standard way for Windows programs.