The Light-O-Rama Visualizer's Channel Assignment Wizard helps to quickly assign channels to complex props, and is accessed from the third tab of the Prop Properties box.
The Channel Wizard is only available for props that have one or more assigned fixtures, and where all fixtures are of the same type. If you have assigned two or more different fixtures -- for example a String fixture and a Flood Light fixture -- to the same prop, the Channel Wizard cannot be used.
The Channel Wizard can quickly create new channels, or assign channels that you have previously loaded via a reference file.
In all cases, once you have specified the required options, the Next button will take you to the next step in the process, while the Previous button will take you back one step.
The OK button becomes available once you have completed all the necessary steps, and Cancel will close the dialog with no changes.
The exact steps necessary to use this wizard depend on whether you are using new channels or reference channels, but the first two steps are the same in either case:
•Step 3 (for reference channels)
•Step 4 (for reference channels)
Step 1
•What Kind of Channels: Select if you will be assigning normal channels to the fixtures, or a set of RGB channels.
•Set/Reset RGB Sample Color to Default: If you selected RGB channels, selecting this box will reset the sample color to the default you specified in the options dialog. Otherwise, the sample color will not be changed.

Step 1
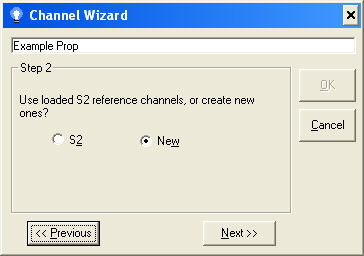
Step 2
Use loaded reference channels, or create new ones:
If you have previously loaded a sequence file or channel configuration file, you can choose to use the channels from it, or to create new channels from scratch.
Depending on your selection, the wizard will present different options: Step 3 (for new channels) or Step 3 (for reference channels).
Step 2
Step 3 (for new channels)
This dialog begins the data collection for the channels you will be creating. Every fixture assigned to this prop will be given the same quantity, type, and color channels, in the same order.
•Number of Repeating Channels Per Fixture: The number of channels each fixture will have.
•Create a Color Sequence: Select the color of each channel by clicking on the numbered box, and then selecting a color.

Step 3 for new channels
Step 4 (for new channels)
•Device Type: Select the type of device each of these channels will emulate.
•What LOR Addressing Mode Should Be Used: If you selected the LOR device type, then these radio buttons are active. They allow you to choose between Normal addressing (256 max circuits per unit) and Legacy addressing (16 max circuits per unit).
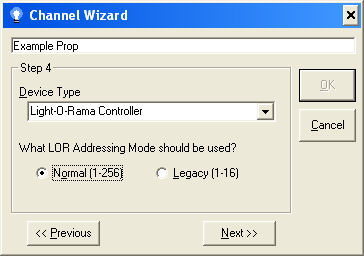
Step 4 for new channels
Step 5 (for new channels)
When the wizard runs out of circuits on a unit (Automatically use next unit / Prompt me): While assigning circuits to channels, there may not be enough circuits on any one unit to satisfy the total number of channels needed. If you select Automatic, once the Visualizer runs out of circuits on a unit, it will continue on to the next channel by incrementing the unit ID and setting the circuit back to 1 (or whatever the first valid circuit of this device type is).
If, however, you select "Prompt me", then when the system runs out of circuits, a dialog box will appear allowing you to select the next unit / circuit that the Visualizer should use.
Use the same channels on every fixture of this prop: There may be times when you want to duplicate the channels being created across all the fixtures rather than sequentially increment them. If you check this box, each fixture will get an identical copy of the channels created.

Step 5 for new channels
Step 6 (for new channels)
This is the last step for non-CCR fixtures that are using new channels.
•Select the starting address for the first channel of the first fixture: These dropdown boxes allow you to set the first address of the first channel of the first fixture associated with this prop. Depending on the device type selected, one or more of these fields may not be available (since they don't apply to the device selected). Once you have set the address and pressed OK, the Visualizer will assign the channels to the fixtures.

Step 6 for new channels
New Channels Summary
To assign new channels, the system will update every fixture of a prop in the order that they are assigned to the prop. For each fixture, the system will create the number of channels specified in step 3, in the color order specified. The first channel created on the first fixture will use the parameters you specified in step 6. For each channel created after that, the system will increment the previous circuit ID by 1. If the system runs out of circuits for a particular unit, it will automatically increment the unit ID by one, and reset the circuit ID to one (or whatever the minimum for the appropriate device type is) if "Automatically use the next unit" was selected in step 5, or a prompt will appear if "Prompt me" was selected in step 5. If you checked "Use the same channels on every fixture of this prop", the second and subsequent fixtures will get the same channels as the first one.
Step 3 (for reference channels)
•Number of Repeating Channels Per Fixture: The number of channels each fixture will have.
•When the wizard runs out of circuits on a unit (Automatically use next unit / Prompt me): While assigning circuits to channels, there may not be enough circuits on any one unit to satisfy the total number of channels needed. If you select Automatic, once the Visualizer runs out of circuits on a unit, it will begin assigning channels with the next loaded reference channel unit. If the system runs out of units for a particular device type or network, you will be prompted.
If, however, you select "Prompt me", then whenever the system runs out of circuits, a dialog box will appear, allowing you to select the next reference channel that the Visualizer should use.
•Use the same channels on every fixture of this prop: There may be times when you want to duplicate the channels being created across all the fixtures rather than sequentially increment them. If you check this box, each fixture will get an identical copy of the channels created.

Step 3 for reference channels
Step 4 (for reference channels)
This is the last step for non-CCR fixtures that are using reference channels.
•Select first reference channel: The Visualizer will sort all the loaded reference channels into order by device type, network, unit, and circuit. The system will then assign channels in the order that they are sorted.

Step 4 for reference channels
Reference Channels Summary
To assign reference channels, the system first sorts all channels into device type, network, unit, and circuit order. The system will then update every fixture of a prop, in the order they are assigned to the prop. For each fixture, the system will create the number of channels specified in step 3. The first channel created on the first fixture will be the one selected on step 4. For every channel after that, the system will assign the next loaded and sorted reference channel. If you specified "Automatically use next unit", the system will continue to assign the next loaded reference channel until the wizard completes, or the system runs out of channels with the device type or network of the channel you selected in step 4. On the other hand, if you specified "Prompt me" on step 3 and the next unit to be assigned is different, or if you ran out of circuits for a particular device type or network, you'll be presented with a dialog to select the next reference channel to be used. If you checked "Use the same channels on every fixture of the prop", the second and subsequent fixtures will get the same channels as the first one.